Tablet Weaving and Ply-Splitting Books, Tools & Kits
Tablet Weaving and Ply-Splitting Instruction
I offer individual instruction in tablet weaving and ply-splitting on Zoom and in my studio in Portland, Oregon by appointment. Please contact me to make arrangements. I accept students as young as age 6, and there is no upper age limit! Some students take lessons on a regular basis, such as an hour or two per week. Others come to the studio occasionally for a lesson to get started with a new concept, and then practice their skills at home (or in the studio) until they are ready for the next step.
Topics: Please scroll down to see descriptions of the topics that I teach. We can tailor any of these topics to your personal interests.
Studio instruction fee: $30.00 per hour for private instruction. If you will be here during lunchtime, there are many restaurants within walking distance, and a lovely park right across the street.
Tools and Materals: You are welcome to bring your own tools, yarn, and cords to use in class, or you may purchase what you need from me. Please let me know well in advance if you would like to purchase cords or tools , since these items are made to order.
Location: My studio occupies the entire second floor of our home near Laurelhurst Park in SE Portland. My husband converted an unfinished attic into this beautiful space, which has skylights, a ceiling which reaches 16 feet high, and the original wood floors. You will be surrounded by colorful yarn, examples of my work since the 1980s, and textiles that I've collected from around the world.
I offer Zoom programs on tablet weaving and ply-split braiding for guilds. If you are interested in a Zoom program for your guild, please contact me for more information.
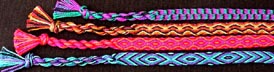
For ages 6 and up. Children easily learn how to weave, and can complete a bracelet in about an hour. Choose colors and patterns including checkerboards, wavy lines, chevrons, or diamonds. Other simple projects include choker necklaces, ankle bracelets, bookmarks, and shoelaces.
The friendship bracelets shown were woven with 8 tablets and 5/2 perle cotton.
Introduction to Tablet Weaving: Flat and Tubular Warp Twining
Learn the basic tablet weaving techniques shown in my books Tablet Weaving for Parents and Children and Tubular Cardwoven Neckpieces, and my video, Weave a Neckpiece. I will show you how to make a continuous warp and how to flip and turn the tablets to create striking geometric patterns in warp twining (the most common structure in tablet weaving). You will be able to examine many examples of my tablet-weaving, including jewelry, scarves, inscription bands, and bands featuring geometric and pictorial designs from around the world. No previous weaving experience needed.
Two-Hole Andean Pebble Weave with Tablets
For ages 10 and up. In this class, learn to make a pebble weave warp (a variation on the continuous warp, since the tablets can't be flipped), how to read the graph and weave traditional Andean designs, and how to create your own designs. We will use the instructions and graphs from my booklet Two-Hole Andean Pebble Weave.
The usual corner holes are not used. Instead, holes are punched in the sides of the tablets. For the pattern, one hole is threaded with a light thread, and one with a dark thread. For each row of the pattern graph, each tablet is simply turned so that the color in the top of the shed matches light or dark as indicated in the graph. It is very easy to weave, and, if mistakes are made, very easy to unweave! The band is completely reversible, with the pattern on the back in the opposite colors.
Pebble weave is traditionally a pick-up technique. The Dutch weaver Marijke van Epen, author of The Unknown Tablet Weaving and other books, analyzed the structure, and determined how to weave it with tablets.
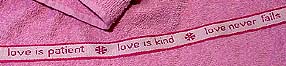
Weaving Peace --An Introduction to Tablet-Woven Calligraphy
Weave peace, love, hope, joy -- and contemplate the meanings of these words in your life as you weave them. Learn and practice double-faced tablet weaving using graphs from my book Please Weave a Message. The band will use 24 tablets for the letters, and an alphabet based on Gill Sans. You may add a decorative border of your choice, and create lovely bookmarks or a banner. Other words graphed and ready to weave are: breathe, smile, sing, play, and weave. I can also graph out words of your choice for you using Excel. Reading the graph, weaving, and unweaving (a very important skill!) will all be covered in detail.
It is helpful if you know how to make a continuous warp, and understand basic warp-twined tablet weaving before tackling the double-faced weave.
Exquisite Tablet-Woven Calligraphy
Tablet weaving instruction for those with some experience who wish to practice and perfect their skills in tablet-woven letters. Weave a beautiful inscription band that you can place on a dresser or altar, hang above a doorway or on the wall, or give to a loved one in celebration of a special life event such as a birth or a wedding.
Some of the most beautiful and decorative bands in history were created with this technique. Here is an opportunity for tablet weavers with some experience in double-faced weaving to practice and perfect their skills by weaving more intricate designs that require more tablets. One source that you could use for designs is my book Double-Faced Tablet Weaving: 50 Designs from Around the World. Motifs in this book come from many different cultures and times, and are inspired by designs from a wide variety of craft media. Designs appear on both sides of the fabric, with colors reversed. Most of the designs require 48 tablets in the pattern area, and some need 56 tablets.
Double-Faced Tablet-Woven Mug Rugs
You can weave beautiful mug rugs with tablets. The mug rugs shown here use 75 tablets, and the finished mug rugs are around 4" square. I wove them using the double-faced weave structure (which has 3-span warp floats) and alternating thick and thin wefts. It was an interesting challenge to come up a way to combine the two! You don't need a loom, just a board and tensioning blocks. You can weave dramatically different designs for each mug rug on your warp, since every tablet is individually-controlled. Students must know how to make a continuous warp and have some experience with warp-twining and the double-faced weave.
Tablet Weaving with S p a c e d - O u t Warps
Tablet weaving is usually thought of as a technique for creating a firm, narrow, completely warp-faced band. However, when a reed is used to space out the warp threads, you can control the sett, and can weave soft, flexible fabrics with tablets. The weft also becomes an important design element. You can weave many different structures, and can change from one to another at any time. This is a great technique for spinners who would like to be able to weave scarves, but don't want to invest in a loom; or for any creative, innovative weaver. I was inspired by Herbi Gray's book, On-Loom Cardweaving: A Modern Extension of an Ancient Craft.
Instead of a loom, you can simply use a board and tensioning blocks. Make a continuous warp; then cut the ends and thread them through a reed scrap that is left hanging loose on the warp. Beating with the reed scrap keeps the warps s p a c e d - o u t ! Learn to set up the warp, and weave a sampler that includes warp twining, basket weave, log cabin, plain weave double cloth, and gauze weave. You can find my article "S p a c e d - O u t Tablet Warps!" in Weaver's, Issue 40, Summer 1998, p. 46-49. Students must know how to make a continuous warp and should have a basic understanding of warp twining.
Tablet-woven Scarves
Scarves -- soft and wooly for winter, light and lacy for summer -- can be woven with tablets. No loom is needed. This is a practical application of the idea of using a reed scrap to space out the warps and control the sett. Instruction for scarves will focus focus on two structures -- gauze weave and warp twining. You'll be surprised at the luscious fabrics you can create with tablets and a reed! You can find my article "Tablet-Woven Gauze Scarves" in Weaver's, Spring 1999, p. 64-65.
Students must know how to make a continuous warp, understand the basics of warp twining, and have some familiarity with the concept of spaced-out tablet warps.
Warp Textures and Crossed Warps
There are several ways to create texture in a warp made from a smooth yarn. A warp of a solid color allows the texture to be the dominant feature.
Flipping the tablets, which changes the twining direction, can be used in combination with turning variations for subtle textures. Warp floats can be created by moving certain tablets out of the pack to "idle" while the rest of the pack is turned. Leaving some holes empty when threading the tablets leaves depressions in the weaving in which the weft shows.
The tablets can be moved to a different place in the deck so that warps cross. This can be done in a very controlled way to create more dramatic textures which can resemble cable knitting. Or the tablets can be moved spontaneously to create a more organic effect.
Learn the basic principles of making cords for ply-splitting, as well as making decorative cords for shoelaces, package-tying, and jewelry.
Begin by using smooth yarns such as 5/2 or 10/2 perle cotton to make one-color cords for ply-splitting. I will explain my precise and repeatable cordmaking techniques, and how the amount of overtwist can be controlled for soft or firm cords depending on your end purpose. With the basic techniques under control, you can choose to experiment with making the kinds of cords that interest you. Possibilities include cords which change color along their length, adding beads, using textured yarns and unusual fibers, and anything you can think of. Spinners are encouraged to bring spindles or wheels and experiment with any fiber. I don't spin, but will try to help you make plied yarn/cord suitable for ply-splitting. Fibers including wool, silk, rayon, tencel, cotton, metallics, raffia, paper, fishing line and all sorts of textures are welcome!
Ply-Split Braiding
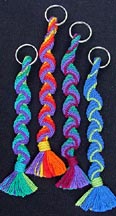
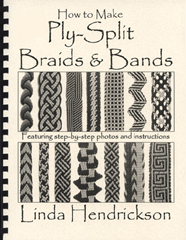
Ply-split braiding is a technique developed by the camel herders of India. It is slow, meditative, and completely portable. Using plied cords and a gripfid, beginners can learn the basics of SCOT (single-course oblique twining) to make the Waves Braid shown on the far left. Ply-splitters with some experience can learn any of the 28 projects in my book How to Make Ply-Split Braids & Bands.
Have a look at my Kits for Ply-Split Braids and Ornaments page to see over a dozen ply-split braid designs available as kits to help you learn the techniques of ply-split braiding.
Techniques for Ply-Split Jewelry
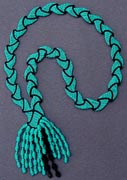
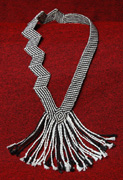
Ply-split braids can curve, zig-zag, spiral, divide and reconnect, leading to many interesting designs for jewelry. Beads can be added during cordmaking, or strung on the cords while the braid is in progress.
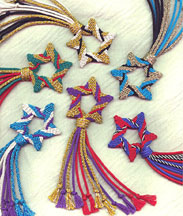
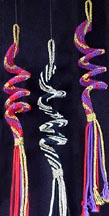
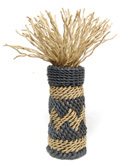
Ply-Split Star and Spiral Ornaments
Learn to make beautiful star and spiral ornaments in SCOT (single-course oblique twining). The cords are made with 10/2 perle cotton and metallic yarns.
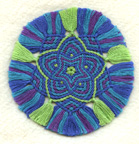
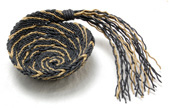
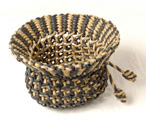
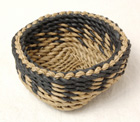
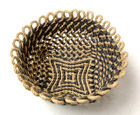
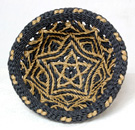
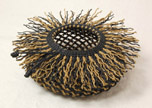
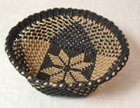
Using prepared cords, make a beautiful star-shaped table mat using non-traditional variations of the SCOT technique (single-course oblique twining). Instruction will introduce you to the concepts of making ply-split mats by starting in the center and adding additional cords. Color, value, and way the cords are added (which cords are splitters and which are splittees) work together to determine the design. The concepts learned in this class will prepare you for three-dimensional ply-splitting -- baskets and hats.
![[warp-twined patterns]](xmasbow.gif)
![[tubular warp twining with beaded lizard pin]](bolo.jpg)
![[tubular warp twined necklaces]](necklaces-tw-tubular.jpg)
![[pebble weave band with twined borders]](peruband.gif)
![[pebble weave]](pebble2.gif)
 It is helpful if you know how to make a continuous warp, and understand basic warp-twined tablet weaving before tackling the double-faced weave.
![[tablet-woven double-faced mug rug with alternating thick and thin wefts]](tablet-weaving-mug-rug-spiral.jpg)
![[tablet-woven double-faced mug rug with alternating thick and thin wefts]](tablet-weaving-mug-rug-hmong.jpg)
![[spaced-out sampler with basket weave, log cabin, double-cloth and gauze weave]](spaced1.gif)
![[Gauze weave scarf with space-dyed warps]](ikatgauz.gif)
![[Tablet-woven scarf in gauze weave with a weft after every two turns]](gauz2x.gif)
![[warp textures]](texture.gif)
![[orderly warp transpositions]](wrptrn.gif)
![[organic warp transpositions]](transpos.gif)
![[cords with color changes along their length]](cords-with-color-changes.gif)
![[SCOT necklace ideas]](scot-necklace-ideas.gif)