
Tablet Weaving and Ply-Splitting Books, Tools & Kits
My Experiences at Spliterati-01, the First International Ply-Split Braiding Convention
Spliterati-01 was held in Bampton, a village southeast of Oxford. The exhibition Expanding the Girths was held at the West Ox Arts Gallery in the Bampton Town Hall. The workshops and lectures were held in the Bampton Village Hall, across the street. It was a truly wonderful and unforgettable experience. Many thanks to the organizers: Jenny Parry, Sandy Jessett, Melanie Venes, Julie Hedges, and Ann & Ralph Norman for countless hours of hard work to make this possible.
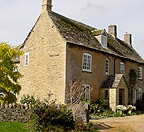
 I stayed at The Pound Bed & Breakfast, a lovely 17th-century farmhouse (left) in the village of Clanfield, about two miles from Bampton. Cows grazed in the pasture just past the stone fence at the back of the house, and next door was an 800-year-old church, St. Stephens (right).
Thursday, Sept. 27 -- I taught the first Spliterati workshop, "Great SCOT! Fanciful Ply-Split Braiding", a class for beginners. Ann Norman came in for a while with a Tibetan Twister and some of her colorful wool yarn and gave a lively demonstration of cordmaking. The hardest part of a class for beginners always seems to be getting the hang of leaving a quarter-twist and a half-twist. As always, I felt a sense of excitement (and relief!) when students "got it", because then they were on their way. Everyone made a curvy braid called Meander on a keyring, and some started making star and spiral ornaments.
Friday, Sept. 28 -- I had expected to stay at my B&B in the morning, and go into Bampton when the exhibition opened later in the day. But Ann Norman called at breakfast with a surprise -- she had arranged for me to join Erroll Pires, Noemi Speiser, and Peter Collingwood that morning for a couple of hours...what a treat to spend time with these three. Erroll teaches at the National Institute of Design in Ahmedabad, India, and has been studying ply-split braiding with the girth makers in the Thar Desert for the past 16 years. He is an expert on the traditional structures, and has used twined linkings to create stretchy ply-split dresses and bags. Noemi is the great braiding expert from Switzerland, and author of The Manual of Braiding. Her latest book is Old English Pattern Books for Loop Braiding, a monograph critically comparing English instructions from the 15th and 17th century. And of course Peter is the author of The Techniques of Ply-Split Braiding as well as exhaustive reference books on rug weaving, tablet weaving, and sprang, plus "The Maker's Hand", a close look at many textile structures.
One of the many things we talked about was a book from Japan called Spiritual Fabric, about the textiles of the Miao people of China. Peter had brought a copy for us to examine, particularly because it has photos showing ply-split braiding as one of the techniques they use.
 In the early afternoon, we went to see John Gillow, who had arrived at the Bampton Town Hall with ply-split camel girths and other beautiful textiles for sale. John is a textile collector and dealer, and author of Traditional Indonesian Textiles, Printed and Dyed Textiles from Africa, and other books. I bought something quite unlike a camel girth, a saye gosha (left), which is a V-shaped embroidery. John said it was made by Uzbeks in Afghanistan, probably sometime between 1940-1960. He had purchased it in Pakistan the first week of September, just a matter of days before the terrorist attacks in New York and Washington. So this is not only a beautiful textile, but one which has many emotional overtones. Later at home, I found a photo of one with the same design in the book Traditional Textiles of Central Asia by Janet Harvey. She says these embroideries are "designed to hang over the rolled-up bed-quilts in tents and houses during the day".
People began gathering in the sunshine outside the Gallery, waiting for the exhibition to open. What a joy to go into that room! The front half of the rectangular room was filled with many traditional goat-hair and cotton girths displayed full length; camel necklaces and other regalia embellished with buttons, beads, shells, and elaborate bobbles and tassels; large photographs of girthmakers and camels by Peter; and even a five-foot-tall camel dressed by Spliterati participants. The back half of the room was an exciting contrast, overflowing with innovative ply-split pieces in two- and three-dimensions that would probably puzzle the girthmakers. There were 104 contemporary pieces by 28 artists, and the cords were made from many different materials, including wool,alpaca, mohair, linen, jute, hemp, cotton, paper, silk kimono strips, polypropylene, acrylic, nylon, rayon, and stainless steel. It was a truly international event, with artists from India, Japan, Switzerland, UK, and USA. Be sure to look at Peter's photos from India and the examples of contemporary work.
Saturday & Sunday,September 29-30 -- Master Class with Peter Collingwood. Peter started his class by immediately taking us across the street from the workshop to the gallery -- a great way to begin! There, each of us discussed our work and talked specifically about our own pieces in the exhibition. I modeled my hats for the group. I think a ply-split fashion show can't be too far off... already in this first ply-split braiding exhibition we had hats, dresses, shoes, bags, and jewelry! In many cases, the pieces shown represented the very first time ply-split braiding has ever been used to make these items.
The subject of Peter's workshop was "Dimensionality". He presented about a dozen (!) different possibilities, showed his samples, and then told us to just start experimenting with anything we liked. Oh... what to pick? A triangular bowl, a box with sharp right-angle turns, layering in plain twining, two-layered twined linking, inflating a two-layered fabric...?
I concentrated on the latter, because I thought it might have some possibilities for making ornaments. I started with linen cords plied AABB, and created a square in two-layered interlacing (cords at right angles). Once the square was completed, I started working in TLOI and soon the piece shaped itself into a two-layered half-sphere. I pulled the layers apart and stuffed yarn in the center.
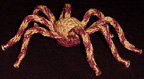 At this point, I had a ball, half gold and half red, with cords sticking out all around the equator. While I was looking at this, trying to think of what to do with the cords, I realized I could make my ball into a spider. I had 32 ends, so this conveniently allowed four cords for each of eight legs, which I worked in SCOT. When I got home, I put wire into the legs so he (she?) would stand up straight. I really like this spider, in spite of its anatomical incorrectness (all cephalothorax, no abdomen, for one thing)! I've been searching the Internet for spider photos, and discovered the Costa Rican Red Leg, which has red and black striped legs. I think it might be fun to make a ply-split spider from red and black chenille cords. I will be teaching spider-making workshops in the future -- it is a good way to learn ply-splitting structures and end up with a special finished project.
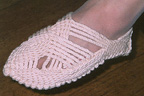 Noemi Speiser was in the workshop, and at one point modeled one of her shoes for us!
I wish I had spent a little more time looking at what everyone else was doing, as I'm sure there were many interesting things happening in the workshop. In addition to making the spider, I also experimented with two-layered twined-linking and the structure used in the mukhiarna (traditional anti-fly fringe) -- POT with slits -- which creates a stable open meshwork.
Peter had a notebook with instructions that he had written for himself while figuring out many of the ideas presented in the workshop. These are mostly new ideas, not presented in his 1998 book The Techniques of Ply-Split Braiding. A new book is already needed, to address contemporary and especially three-dimensional concepts!
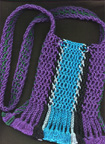 Monday & Tuesday, October 1-2, Master Class by Erroll Pires -- Erroll makes many of his ply-split items with 2-ply cords and alternating rows of R/R and L/L twined linkings. The 2-ply cords make a lighter-weight fabric than the traditional 4-ply, and using twined linkings creates an open, stretchy fabric. Erroll has used this combination to create bags and many garments, including full-length dresses. In his class, he worked with each of us individually to make a seamless shoulder bag with this technique. I used 5/2 and 3/2 perle cotton for my cords. At left, Erroll is shown helping me get started on the bag strap. My finished bag (right), including the fringe, is about 5-1/2" x 8".
Erroll's has a clever way of closing the bottom of the bag and then turning the cords into a neat and compact fringe. Each of the fringes is made by joining a pair of cords from each side of the bag, and working several rows of POT with the four cords. The ends are wrapped.
I had to leave immediately after Erroll's class to return to the US, because of prior teaching commitments in the US that weekend. I feel so fortunate to have been part of Spliterati. I have many new ideas to try, and look forward to seeing what other ply-splitters will be creating in the future.
 I was the only American attending Spliterati-01. My participation was made possible with the help of a grant from the Regional Arts and Culture Council, Portland, Oregon. I am very grateful to RACC for its support.
Ply-Splitting Gallery
Shop
Home
This page updated on June 21, 2013.