
Laurelhurst Fiber Art Studio & Urban Farm
Tablet Weaving * Ply-Splitting * Mindfulness * Permaculture
Ply-Split Rugs
The most recent rug is at the top of the page. More rugs will be added. Please visit again.
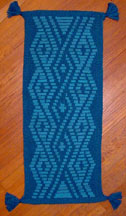 "Blue Interlacements" -- A Ply-Split Twined Rug with Cords in Warp/Weft Alignment
I'm not sure yet about the correct terminology for what I'm doing here. Completed in Spring 2008, is the first rug I've made using my new idea of lining up all the dark cords parallel to each other in the vertical direction, and then adding all the light cords, one-by-one, in the horizontal direction, following a pattern graph.
The exciting thing about this is that every crossing involves a light and a dark cord, so every splitting can make either dark or light show. Theoretically, any design that can be graphed on square graph paper can be created with the technique. However, distortion needs to be kept in mind, so there are some limitations as to what will actually look good.
I made this rug using 60 dark cords in the lengthwise direction, and 126 light cords in the crosswise direction. I graphed the design in Excel. I strung all of the dark cords on a bamboo pole, centering each cord as I added it, and started working in the middle of the rug. I removed the pole once I had worked enough rows to keep everything in place. I worked to one end, and then from the middle to the other end. Also, as I added each cord, I centered it, and then worked from the center to one edge, and then from the center to the other edge. Because of the size of the rug, I found it was easier to learn to ply-split left-handed when necessary than to turn it over. But it was easy to carry around the house, and I could sit down wherever I wanted and work on it.
I finished the rug by pulling each cord back into the rug through six cords, in the same space occupied by the cord next to it, and then clipped the ends. At each corner, this was impossible, so the cords in the corners are pulled together to make a tassel. I found this finishing process much more satisfying than wrapping each cord, and this method also makes a very firm edge to the rug which will keep it flat on the floor.
The rug is approximately 17" x 44", not including the tassels.
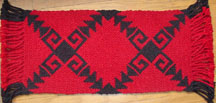 Rug worked entirely in SCOT
By the time I started my red and black rug (December 2004), I realized that I didn't have to work the solid-color areas in POT, but could use some variation of SCOT instead, which gives a different texture. Those areas of this rug are all worked in minimal SCOT, "split 2, pull 1 through".
I made the rug with 52 red cords and 20 black cords -- the number I was able to make with amount of yarn that I had in my studio in those colors. Actually, the red consists of two different shades, and the black also has some dark maroon and dark gray. The result is a richer appearance than if I had used just two solid colors. The rug is approximately 13" x 25-1/2", plus 3-1/2" fringe on each end.
For the fringe, I wrapped two cords together all the way across at the end of the ply-splitting, and then wrapped each cord individually. It was really time-consuming, but looks nice and is more educational to see the lengths of unsplit cords as fringe of the finished rug.
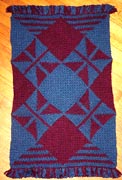 Rug combining POT and SCOT,
based on a camel girth in the collection of Errol Pires.
This is my first ply-split rug, completed in December 2004. I made the cords from rug wool in 2002, intending to make a ply-split rug, but the cords stayed in my studio for a couple of years while I thought about designs.
In October 2004, Errol Pires from India taught a workshop at the Oregon College of Art and Craft in Portland, and showed us how to create designs combining POT and SCOT, something I had not tried before. He also allowed me to scan a magnificent camel girth from his collection with these designs. Also during the same workshop, Maggie Machado brought in two ply-split rugs she had made. She used macrame cord to make 2-ply cords, and worked the rugs in POT. Click here to see Maggie's rugs.
After the workshop, I was inspired to study the chapter on POT/SCOT designs in The Techniques of Ply-Split Braiding by Peter Collingwood. Now that I have tried ply-splitting as a rug-making technique, I am really excited about it!
In this rug, the solid color diamonds in the center, and the half-diamonds along the edges are worked in POT. In the other diamonds, every crossing is a meeting of the two colors, and either color could show, depending on how they are split. So the design possibilities in those areas are just about endless!
The finished rug is approximately 20" x 30", plus 2" fringe on each end. I used 88 cords (44 of each color) for this rug; they were 56" long and about 3/8" in diameter. They should have been about 10" longer! I did have to add some new length to a few of them -- a new experience. I didn't try to splice them. I just overlapped the old and new ends, and then after completing the splittings, unplied all of the overlapped ends and wove them into the back of the rug. That worked OK, but I would certainly prefer not to have to do that.
This page updated August 25, 2008.